


A Guest Blog Post by Jim Ausfahl
Disclaimer: This material has been modified
from the public domain US
Military field manual, FM 5-80.
As a reminder, the triangle bandage is a piece of cloth, often unbleached muslin, that is a right triangle with legs about 40? (102 cm) long, and a hypotenuse, or long side, around 56.6? (144 cm). It is folded on itself three times to make a cravat bandage. Remember: for all wounds, the first thing to do is to control the bleeding, clean and cover the wound with gauze padding, and if it is available, some antibiotic ointment. The bandage is used to lock the gauze in place. In looking at the bandaging below, it will be assumed that has already been done. This time, we’ll be bandaging the head and its associated structures; some of these will require two cravats.
Take the Online Course!
https://www.outdoorcore.com/courses/how-to-cravat-bandaging
Triangular cloth bandages are one of the least expensive and lightest weight items in a wilderness first aid kit. Yet, they can be used to splint, sling, or bandange nearly every part of the human body. In this course, you’ll learn from a board certified physician how to use them in over 25 different ways to stabilize common injuries in the bck country until medical help can be reached.
THE SCALP
Bandaging the scalp is only
modestly more challenging than what we’ve already done. Begin by folding the long edge over itself
three times, about an inch or an inch and a half wide. Having done that, drape the bandage over the
scalp, with the right angle going down the back of the neck and the middle of
the folded part over the forehead. Bring
the two ends of the folded part behind the head and to the middle of the scalp. To minimize the risk of this slipping up, put
the folded part under the occiput—that’s the bump you can feel on the back of
your skull. Tie a square knot in the
middle of the forehead to anchor the bandage.
Then, take the right angle and fold it up, tightening the part over the
scalp then tucking the end into the folded part. If possible, and pinning it in
place with a safety pin It is much clearer if you look at the diagram below

Clearly, this bandage not only will handle the scalp, it will do well for the forehead and the back of the head as well.
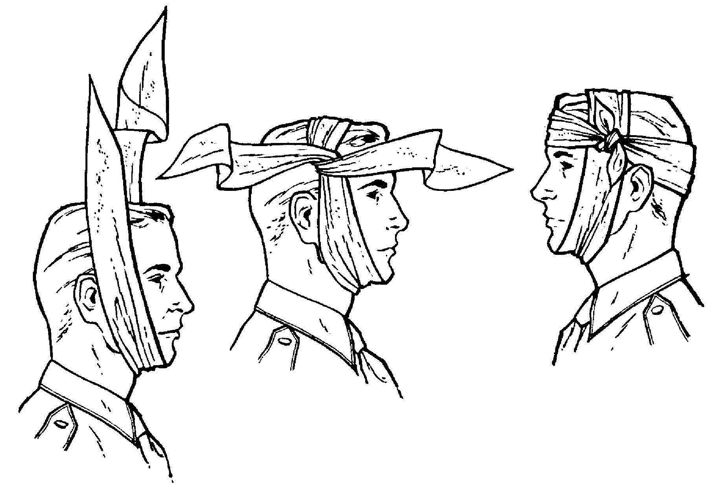
THE HEAD or EAR
There is an alternative approach
to bandaging the head, which would be used for the back of the head, the sides
of the head or the forehead or the ear.
The bandage needs folded into a cravat.
Depending on where the injury is, put the middle of the bandage on one
side of the head; if the injury is to the ear, put the middle of the bandage
over the injured ear. Bring the ends of
the bandage around the other side of the head and back to the first side,
fixing it in place with a square knot.
For bandaging the ear, the cravat should go up diagonally, to leave at
least one eye uncovered, then back to the bandage over the ear, where the
square knot is tied. The diagram shows
the bandaging done for the head; adapting this to the ear is simple.

THE EYE
Sometimes there is need to
bandage an eye. Doing this requires two bandages, both folded into cravats. Drape one cravat over the head, covering the good eye, so it hangs down the back of
the victim’s neck and down his face.
Take the second cravat, wrapping around both eyes and over the first
cravat, tying it in the front, over the uninjured eye. Finally, take the ends of the first cravat
and loop them over the head, tying them on the scalp so that the second cravat
is lifted off the good eye. The figure below
will help this all make sense.

THE CHEEK or JAW
Sometimes, there is need to
bandage a cheek, the area below the chin, a small area on top of the scalp or a
need to immobilize a jaw temporarily, as might be for a fracture of the jaw or
a dislocation of the jaw. A single
bandage, fold into a cravat, is needed.
Position the cravat under the jaw, with the more distant part of the
cravat a few inches longer than the near one.
Bring the far side across the top of the head to the temple of the near
side, then twist them around each other a quarter turn, so the two sides are
horizontal, one pointing forward and the other backward. At this point, the two free ends should be
about the same length. Take the ends
around the victim’s head and knot them on the other side. The process is illustrated clearly in the
figure below.

The next posting will handle bandaging the chest, hip, buttock and shoulder.
Jim Ausfahl is a physician in active medical practice, in Peoria Heights, Illinois, studying the art of surviving in a challenging environment and sharing what he knows.